De essing vocals is a highly underrated technique in mixing and many engineers don’t utilize it to its full potential. This is unfortunate as sibilance caused by things like esses or Ts can be an audio engineer’s nightmare.
These artifacts may not be an issue when recorded but can become amplified when the vocal’s compressed or EQ’d. This can make for an unnatural sounding vocal track that’s distracting to the listener.
Taylor begins recording the lead vocal for “Feeling Alive,” a new song set to release in Oct as part of the Play EP pic.twitter.com/OgB5TM0cTj
— HANSON (@hansonmusic) June 3, 2016
Even with a proper windscreen and vocal technique, sibilance can still cause major issues in the mix stage.
Thankfully there are a number of techniques, known as de essing that can be used to stop vocal sibilance from causing issues in a mix.
De essing vocals goes beyond simply placing a plugin on your lead vocal track. So, read on to discover some of the tricks pros use in there mixes all the time to keep their vocals sounding clean and crisp.
1. Manually De Essing Vocals With Clip Gain
The first thing you can do to try avoiding sibilance issues is manually lowering problem areas during the vocal editing stage.
Most DAWs allow you to lower the volume on specific portions of a recording before any other processing is applied. Each DAW may have it’s own name for this feature, but it’s most often referred to as clip gain.
Logic X users can check out this video for an introduction on how to use to use the clip gain feature.
With this one can go through and turn down any esses or other annoying parts of the vocal track while leaving everything else as is. It can be time consuming to do this for a whole recording but the results can be amazing, so it’s worth trying if only in the worst areas.
2. Lowering Sibilance with EQ
Equalization can also be a useful first line of defence in vocals where the esses may amplify specific frequencies more than others.
Try boosting around the 5k-8k range to search for prominent frequencies. Lower them a bit once found but don’t be too aggressive as you still want to hear some of this content.
Another thing to watch for when using this technique is that lowering high end content can make a vocal lose presence. To counteract this effect, experiment with a high shelf boosting frequencies slightly above the sibilance.
3. De Essing Plugins
There are several de essing plugins out there that act as a quick and effective way to clean vocals. Most work in a similar fashion combining a compressor with an EQ to turn down only sibilant frequencies.
However, there are a number of different ways de essers may operate that entail what frequencies it turns down.
Wide Band
A wide band de esser senses when sibilance is being sung and turns down the entire vocal signal during it.
This can be an effective method if there’s an unnatural amount of mid-range or low end content in the sibilance. However, that’s usually not the case and turning down the entire frequency spectrum is not a very transparent approach.
4. High Cut Split Band
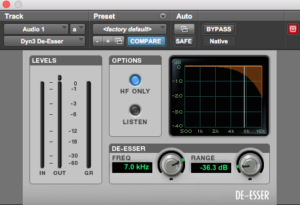
This is probably the most standard method for de essing vocals. It works with a high cut slope that turns down all the frequencies above a specified frequency.
The Dyn-3 Desser that comes with Pro Tools offers High Cut and Band Pass options for de essing vocals.
This is a much more transparent style as the low end content of the vocals can pass through unaffected. However, it can be more aggressive to the higher frequencies due to its high cut slope.
Notch Split Band
As the name suggests, this de esser selects a portion of frequencies to notch out whenever it detects sibilance.
A notch de esser removes specific frequencies, letting the high and low end pass through unaffected.
It’s a nice approach when you want to zero in on only a specific area of the signal and let the rest of the vocals pass unaffected. A good starting point id to try using it in the 5k-8k range.
The “Listen” Feature
Most de essing plugins have a “listen” option which allows the user to hear only what’s being removed from the vocals. I highly recommend using this feature lots when starting out. It’s the best way to check that you’re actually de essing what you want and will help you understand how your de esser works.
Best Vocal De Essing Plugin
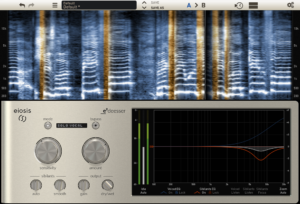
The e2deesser created by Slate Digital and Eiosis is a favourite vocal de essing plugin of mine. It’s extremely versatile, allowing you to choose any of the above mentioned methods along with several others. You can also combine approaches and customize each to operate to varying degrees of attenuation.
It has a large intuitive interface and spectral analyzer making it easy to zero in on exactly where the sibilance is hiding. It also has a built in equalizer allowing you to cut or boost frequencies to compensate for the de essing.
My favourite approach with it is to use a combination high cut band and notch split band. I’ll usually add a high shelf boost with the EQ section as well.
There are several more features so check out this intro video from Eiosis to get an idea of its full capabilities.
5. Over De Essing Vocals
With mixing it’s very easy to have too much of a good thing. This is especially true when it comes to de essing vocals.
It’s important to remember that consonants and sibilance in vocals is not a bad thing. They’re extremely important to the listener understanding the lyrics. So, the point of de essing is to attenuate sibilance to a natural level but not remove it completely.
Digging in too much can result in an unnatural sound almost as if the vocalist is singing with a lisp. If you notice some weird artifacts appearing in the vocals after de essing, back off a little or try changing your target frequency.
6. De Essing a Vocal Reverb/Delay
One of the biggest places that sibilance can cause issues is in the vocal reverb or delay. Every small high frequency esse or T becomes extended making it extremely distracting.
Often times this can be an issue even after properly de essing the main vocal track. The solution to this and something I always do is to de esse the vocal reverb as well.
Aggressively de essing and EQing out the high end before a reverb plugin can help clean up sibilance in a mix.
I’ll do this very aggressively, inserting a de esser and an EQ before my reverb plugin on the reverb buss. This stops any sibilance from entering the reverb and keeps it sounding warm and pleasant.
7. De Essing a Back Up Vocals
In the same way that sibilance is not needed in a reverb chain, back up vocals can often benefit from harsh de essing.
This is best done in cases where the backup vocals are doubling the lyrics of the lead vocal. Any important consonants will be provided by the main vocal track. Because of this, sibilance in the vocal harmonies will only make things too busy in the high end.
The same goes for a vocal double track. In this which case I will often use a high shelf EQ to greatly lower any high end content above 5k. This approach may not be appropriate for every style of song but try it in your mix and see what results you get.
Conclusion
There’s much more to de essing vocals then just inserting a de esser on a vocal chain and letting it do its thing. This approach may work at times, but without understanding how the different types of de essers operate you’re going to have a hard time problem solving.
Beyond simply de essing the lead vocal, you may need to control sibilance in your vocal reverb and backup vocals. You can be harsher with de essing in these cases but on the lead vocal use a gentler approach.
Without any sibilance a mix would sound unnatural. Keep this in mind when de essing and don’t remove all of the high end content from your vocals.
Check out the rest of the Sundown Sessions Blog for more tips on home recording and vocal production.


